|
Size: 180
Comment:
|
Size: 5395
Comment:
|
| Deletions are marked like this. | Additions are marked like this. |
| Line 3: | Line 3: |
| ||<tablestyle="width: 100%;" style="background: #2a2929; font-weight: bold; color: #f6bc05;">~-Quick start guide-~|| | ||<tablestyle="width: 100%;" style="background-color: #2a2929; font-weight: bold; color: #f6bc05; padding: 2px 5px 2px 5px;">{{attachment:lp-diamond-16.png}} ~-Code hosting quick start-~|| ||<style="font-size: 0.9em; background:#F1F1ED; padding:0.5em;"><<TableOfContents(1)>>|| '''Need more detail?''' Take a look at the [[Code]] section of this help wiki and the [[http://doc.bazaar-vcs.org/bzr.dev/en/mini-tutorial/index.html|Bazaar mini-tutorial]]. [[http://doc.bazaar-vcs.org/bzr.dev/en/user-guide/index.html#what-is-bazaar|What is Bazaar?]]. <<Anchor(enable)>> = Enable code hosting for your project = '''Step 1:''' First, [[Projects/Registration|add your project to Launchpad]]. On your project's overview page, click ''Change details'' towards the top-right of the page. ||<tablestyle="font-size: 0.8em; width:30%; background:#F1F1ED; margin: 0 0 1em 1em;" style="padding:0.5em;">{{attachment:change-details.png}}|| ||<style="text-align: center;">'''Edit your project's info in Launchpad'''|| '''Step 2:''' Scroll down the ''Change details'' page and select the check-box marked ''Code for this project is published in Bazaar branches on Launchpad''. ||<tablestyle="font-size: 0.8em; width:30%; background:#F1F1ED; margin: 0 0 1em 1em;" style="padding:0.5em;">{{attachment:code-for-this-project.png}}|| ||<style="text-align: center;">'''Tell Launchpad you want to host your project's code here'''|| '''Step 3:''' Save your changes by clicking the ''Change'' button at the bottom of the page. ||<tablestyle="width: 100%;" style="background-color: #2a2929; font-weight: bold; color: #f6bc05; padding: 2px 5px 2px 5px;">~-Quick tip-~||You can experiment by pushing a branch without linking it to a project. [[Code/PersonalBranches|See more about personal branches]].|| Your project overview page now has a message that reads ''Uses Launchpad for: Code''. <<Anchor(push)>> = Push a Bazaar branch to your project = Bazaar comes with a plug-in that lets you push to and pull from Launchpad directly from within Bazaar. If you haven't already, you need to perform a couple of one-time setup tasks: 1. [[https://launchpad.net/people/+me/+editsshkeys|add your SSH key to Launchpad]] 1. and then log in to Launchpad from Bazaar by typing `bzr launchpad-login` in your terminal. To push your branch up to Launchpad, open your terminal and go to your Bazaar branch. Next up, type: {{{ bzr push lp:~your-id/project-id/branch-name }}} * ''~your-id'': this is your Launchpad id, which is the portion of [[https://launchpad.net/people/+me|your profile page]]'s URL that begins with the tilde * ''project-id'': the id of the project in Launchpad, which you can find at the end of your project's overview page URL * ''branch-name'': whatever name you want to give to your branch, such as ''trunk'', ''main'' or ''experimental'' Replace ''project-name'' with your project's Launchpad id. The id is the final part of your project overview page's URL: e.g. ''bzr'' in ''https://launchpad.net/bzr'' == See your branch in place == Once Bazaar has pushed your branch to Launchpad, Launchpad will scan the revisions in your branch and: * list the branch on both [[https://code.launchpad.net/people/+me|your own code overview page]] and that of the project * enable other people to download the branch and create their own version of it * make the full revision history available in the source-code tab. = Set your project's trunk branch = You can tell Launchpad which of your project's branches is the current focus of development; i.e. which is the trunk. Setting a trunk branch is useful to: * tell people which branch they should download * define which branch Launchpad should provide when someone enters ''bzr branch lp:your-project'' * act as the default target when someone proposes a merge * act as the basis for [[http://doc.bazaar-vcs.org/bzr.dev/en/user-guide/index.html#using-stacked-branches|stacked branches]]. Visit your project's code overview page and follow the link inviting you to set a development focus. ||<tablestyle="font-size: 0.8em; width:30%; background:#F1F1ED; margin: 0 0 1em 1em;" style="padding:0.5em;">{{attachment:set-trunk.png}}|| ||<style="text-align: center;">'''Set your trunk branch'''|| = Let several people commit to the branch = If you want to enable several people to push code to the branch, you'll need to [[Teams/CreatingAndRunning|create a team]] and make that the branch's owner. On the branch's overview page, you'll see an information box on the right-hand side of the page. Click the pencil icon next to your name in the ''Owner'' section and then select the team that you want to own the branch. ||<tablestyle="font-size: 0.8em; background:#F1F1ED; margin: 0 0 1em 1em;" style="padding:0.5em;">{{attachment:change-branch-owner.png}}|| ||<style="text-align: center;">'''Change the branch's owner'''|| = Next steps = You're now hosting your project's code in Launchpad. Anyone can download your code, make their changes and upload their branch for listing on your project's code page. Other people can also propose there branches for merging into your trunk, or any other branch associated with your project. ~+[[Code|Read our full guide to Launchpad Code Hosting >]]+~ |
Launchpad Help > Code > Quick-start
|
Need more detail? Take a look at the Code section of this help wiki and the Bazaar mini-tutorial. What is Bazaar?.
Enable code hosting for your project
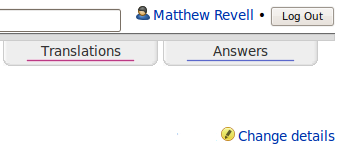
Step 1: First, add your project to Launchpad. On your project's overview page, click Change details towards the top-right of the page.
|
Edit your project's info in Launchpad |
Step 2: Scroll down the Change details page and select the check-box marked Code for this project is published in Bazaar branches on Launchpad.
|
Tell Launchpad you want to host your project's code here |
Step 3: Save your changes by clicking the Change button at the bottom of the page.
Quick tip |
You can experiment by pushing a branch without linking it to a project. See more about personal branches. |
Your project overview page now has a message that reads Uses Launchpad for: Code.
Push a Bazaar branch to your project
Bazaar comes with a plug-in that lets you push to and pull from Launchpad directly from within Bazaar.
If you haven't already, you need to perform a couple of one-time setup tasks:
and then log in to Launchpad from Bazaar by typing bzr launchpad-login in your terminal.
To push your branch up to Launchpad, open your terminal and go to your Bazaar branch. Next up, type:
bzr push lp:~your-id/project-id/branch-name
~your-id: this is your Launchpad id, which is the portion of your profile page's URL that begins with the tilde
project-id: the id of the project in Launchpad, which you can find at the end of your project's overview page URL
branch-name: whatever name you want to give to your branch, such as trunk, main or experimental
Replace project-name with your project's Launchpad id. The id is the final part of your project overview page's URL: e.g. bzr in https://launchpad.net/bzr
See your branch in place
Once Bazaar has pushed your branch to Launchpad, Launchpad will scan the revisions in your branch and:
list the branch on both your own code overview page and that of the project
- enable other people to download the branch and create their own version of it
- make the full revision history available in the source-code tab.
Set your project's trunk branch
You can tell Launchpad which of your project's branches is the current focus of development; i.e. which is the trunk.
Setting a trunk branch is useful to:
- tell people which branch they should download
define which branch Launchpad should provide when someone enters bzr branch lp:your-project
- act as the default target when someone proposes a merge
act as the basis for stacked branches.
Visit your project's code overview page and follow the link inviting you to set a development focus.
|
Set your trunk branch |
Let several people commit to the branch
If you want to enable several people to push code to the branch, you'll need to create a team and make that the branch's owner.
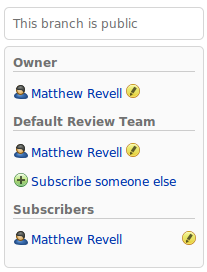
On the branch's overview page, you'll see an information box on the right-hand side of the page. Click the pencil icon next to your name in the Owner section and then select the team that you want to own the branch.
|
Change the branch's owner |
Next steps
You're now hosting your project's code in Launchpad. Anyone can download your code, make their changes and upload their branch for listing on your project's code page. Other people can also propose there branches for merging into your trunk, or any other branch associated with your project.
 launchpad help
 Code hosting quick start


